laravel
在项目的 routers 目录下 的 web.php 中加入下面代码1
2
3
4Route::get('/{html}', function ($html) {
\View::addExtension('html', 'php');
return view()->file(public_path().'/index.html');
})->where('html', '填入访问链接的正则匹配');
生成密钥
1 | ssh-keygen -o -t ras -C "<email>" -b 4096 |
将公钥加入到远程服务器的 authorized_keys 中
1 | ssh-copy-id -i .ssh/id_rsa.pub <user>@<remote_ip> |
安装 OpenSSH 客户端
// 如果是 Windows10 的话,确认是否已经自带,自带了就不用装。
生成密钥
1 | ssh-keygen -o -t ras -C "<email>" -b 4096 |
将公钥上传至远程服务器
1 | scp ~/.ssh/id_rsa.pub <user>@<remote_ip>:pub_key |
登陆到远程服务器
1 | ssh <user>@<remote_ip> |
将公钥加入到 authorized_keys 中
1 | cat ~/id_rsa.pub >> ~/.ssh/authorized_keys |
创建用户管理员
1 | db.createUser({ |
创建用户
1 | db.createUser({ |
Built-In Roles(内置角色):
1 | 1. 数据库用户角色:read、readWrite; |
角色解析
创建空分支1
git checkout --orphan <BRANCH_NAME>
更新远程分支列表1
2git remote update origin --prune
git remote update origin -p
删除本地分支1
git branch -d BRANCH_NAME
删除远程分支1
2git push origin -d BRANCH_NAME
git push origin --delete BRANCH_NAME
新增本地分支1
git branch BRANCH_NAME
切换本地分支1
git checkout BRANCH_NAME
新增并切换分支(本地)1
git checkout -b BRANCH_NAME
You can also run VS Code from the terminal by typing ‘code’ after adding it to the path:
kb(workbench.action.showCommands)) and type ‘shell command’ to find the Shell Command: Install ‘code’ command in PATH command.
$PATH value to take effect. You’ll be able to type ‘code .’ in any folder to start editing files in that folder.Note: If you still have the old
codealias in your.bash_profile(or equivalent) from an early VS Code version, remove it and replace it by executing the Shell Command: Install ‘code’ command in PATH command.
To manually add VS Code to your path, you can run the following commands:
1 | cat << EOF >> ~/.bash_profile |
Start a new terminal to pick up your .bash_profile changes.
Note: The leading slash \ is required to prevent $PATH from expanding during the concatenation. Remove the leading slash if you want to run the export command directly in a terminal.
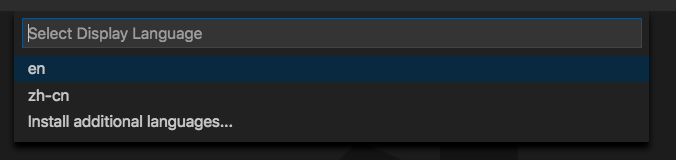
Running the Configure Display Language command will now open a Quick Pick listing the available locales based on the Language Packs you have installed, instead of only opening the locale.json file. When you make a selection, the locale will be automatically updated and you’ll be prompted to restart VS Code for the change to take effect.
MacOS
修改集成终端1
2
3{
"terminal.integrated.shell.osx": "/bin/zsh"
}